The Ultimate Guide to Arnold Rendering
FOLLOW OUR IN-DEPTH ARNOLD RENDERING TUTORIAL STEP BY STEP.
Written by Miguel Rodriguez
3D animation has evolved the landscape of visual media forever. It gives us the opportunity to experience landscapes, structures and beings beyond our wildest imagination. Contemporary cinema uses 3D animation and visual effects in various ways, ranging from heavy-duty to so subtle you cannot even notice it.
That being said, every monster, alien spacecraft and most building demolitions seen on film, television and video games are made with 3D graphics. All graphics must turn into images that can be edited, seen and shown. In order to achieve that, we rely on a process called rendering.
Click here to learn more about InFocus Film School’s 3D Animation and Visual Effects Program
WHAT IS RENDERING?
Rendering is the act of turning your 3D information into tangible images that can be shown on screen. Styles vary from photorealism to a more animated feel. Rendering has become a standard practice with the need for computer imagery on more and more productions. Though the process is complex, it’s still something you can master with some guidance.
In this guide, we will focus on creating a set of renders from Arnold, the standard industry software for 3D rendering. We’ll separate the different passes and layers of a model to later bring into Nuke for Compositing. We will take a look at some of the most basic ways of setting up your render so you can get exactly the passes you need for compositing. If you are new to rendering, you might be wondering, what are render passes? What is compositing? Let’s have a proper look at that.
UNDERSTANDING RENDERING
Here’s a final render of a 3D Character by Marco Nogueira. We will use this model for our demonstration
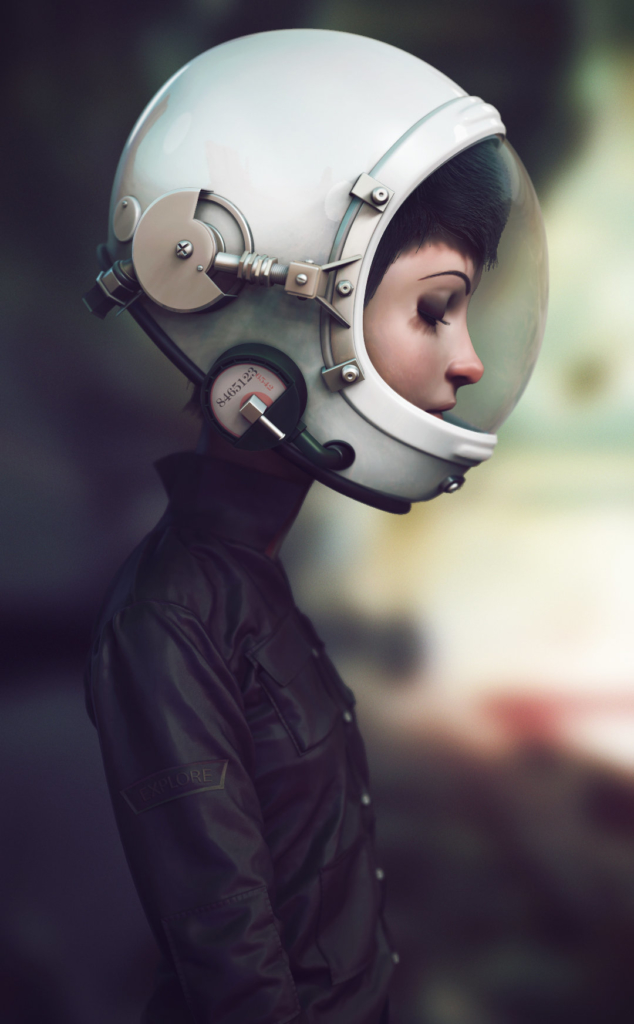
https://www.artstation.com/artwork/XBeon
This beautiful image was created in the 3D softwares Zbrush, 3DS Max and Marvelous Designer.
In order to achieve a look like this, post production was done in Photoshop. And in order to have the most amount of control over the final result, Marco rendered the final image decomposed into its original render passes.
WHAT ARE RENDER PASSES?
A “render pass” refers to the idea that every final render can be decomposed into different parts or settings that make up the final image. Color, lights, shadows, reflection, as well as many other elements.
This is a collection of the render passes used in Nogueira’s character model:
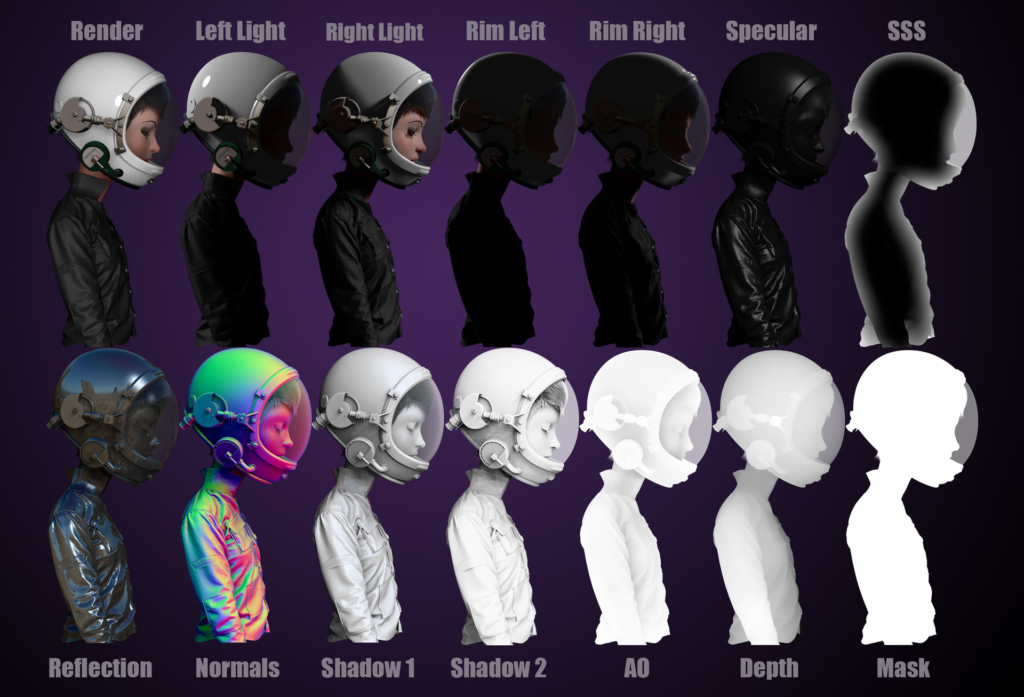
https://www.artstation.com/artwork/XBeon
It’s like having an oil painting where the shapes, the highlights, the shadows, the base and flat colors are all separated into different images that, when combined, make the final version of the image.
WHAT’S THE PURPOSE OF A RENDER PASS?
A render pass allows you to have more control over how these elements combine with each other. And can be a great time-saver when it comes to the complete image.
Let’s say that you realize the reflections on your character’s helmet are a bit too exaggerated. Rather than editing and re-rendering the whole thing again and again to make a small change, you can go into your render pass on a compositing program like Nuke or Photoshop, and fix the reflectivity pass. This could cut a potentially three-hour render into a quick ten-minute fix.
COMPOSITING YOUR RENDER
Compositing is the art of combining visual elements from separate sources into single images. While compositing is a very wide discipline, in the specific case of render passes it’s used to bring all the separate passes in a seamless manner. By doing so, they interact with each other to create the final image, but we can always go back to whatever needs fixing.
Now that we understand this basic concept, let’s jump to how to get started with Arnold in Maya 2020.
TUTORIAL
RENDERING PART ONE: Render Set Up
Arnold is, since 2017, Maya’s default render engine. A render engine is any additional software you use to generate a graphic output. Think of it as a translator. Whatever you create with Maya in the 3D space, Arnold turns into something that can be perceived as finalized images.
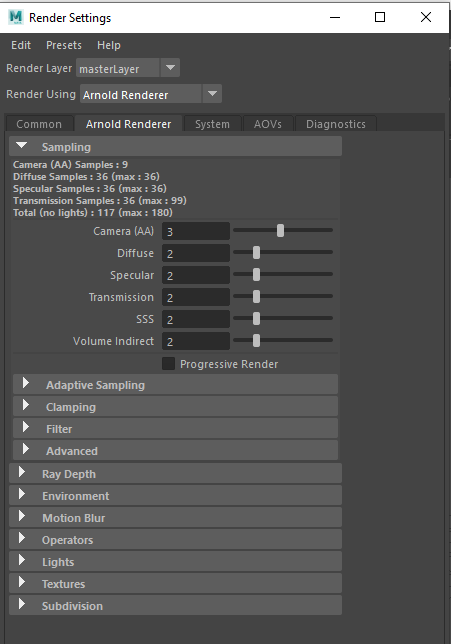
The process is relatively painless, but requires some previous set up and understanding of the Arnold workflow in order to get an efficient render. First of all, we need to take a look at the Arnold settings:
Arnold comes equipped with manifold options organized under four specific tabs (plus the Common tab, shared with all Render Engines.)
While some settings might be self explanatory, it’s a good idea to get familiar with Arnold itself. The official documentation is available on the Maya to Arnold website. We recommend you give it a look, but keep in mind it’s not required for what we are doing today.
Back into Arnold Render settings, a lot of these will be changed as we move through the render process, but we are especially interested in the AOV’s tab.

This is where you want to start to set up your render. AOV stands for Arbitrary Output Variables, which is a really fancy way to refer to render passes.
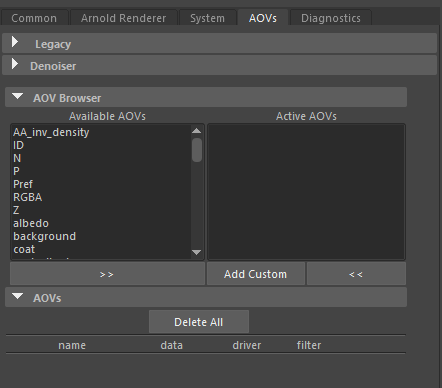
As you can see, the AOV tab is pretty basic. On the left, we have the Available AOV’s, which are the usual passes most scenes require. On the right side, Active AOVs, which show the passes that we will be activating in our scene. We start completely empty since we will be choosing the passes we want to use.
While every work tends to vary a bit, certain passes tend to be default and necessary most of the time.
RENDERING PART 2: THE DIFFERENT AOVS
This is the main, full color rendering of the subject, including illumination, color and color maps. It does not include reflections, highlights and shadows.
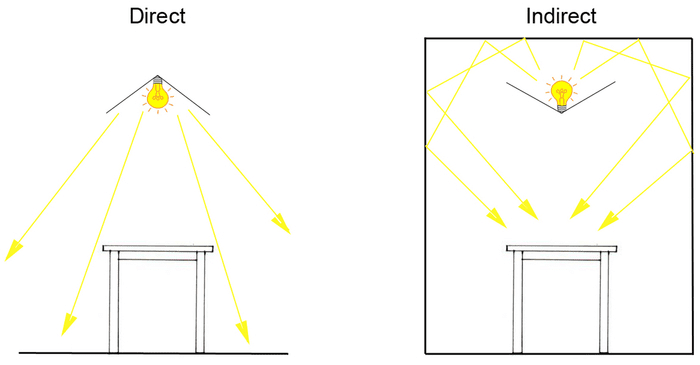
Diffuse, as well as other passes, comes in two separate flavours: Diffuse Direct includes all the direct lighting information, while Diffuse Indirect is, as the name implies, indirect illumination.
Diffuse Direct: This refers to the direct lighting from all surfaces and volumes. The difference between this and diffuse_direct is that this includes any highlights, reflections, etc.
Diffuse Indirect: Indirect light from all the surfaces and volumes. The difference between this and diffuse_indirect is that this includes any highlights, reflections, etc.
As shown in the graphic, the direct light comes and hits the table directly from the source. The indirect light, inverted and screened, hits the table eventually after bouncing off the walls.
We also have other passes that are very relevant, although in some cases we might not need all of them, such as:
Shadow_matte: Shadows in the scene, computed as the ratio of occluded direct lighting over unoccluded direct lighting.
Specular (Direct, Indirect): This is the mirror-like reflection of light waves from a surface.
Transmission (Direct, Indirect): A fancy name for refraction, which is the bending of light as it passes from one transparent substance into another.
Notice that refraction and reflection are completely separate phenomena in the 3D world.
RENDERING PART THREE: ADDING YOUR AOVS
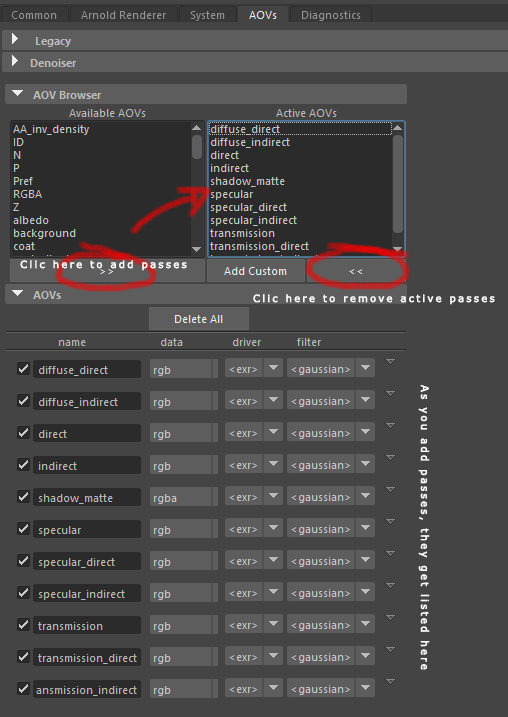
Once we know the passes we need, we can start adding them to our Active AOVs under this tab, inside the Render Settings.
The way to do this is quite simple:
- Scroll through the Available AOVs on the left side
- Find the AOV that you need. Click on it.
- Click on the >> symbol to move the AOV to the Active column.
- That’s it! As you add new passes, they will be listed under the browser. (Just like in the previous image)
If we now render this from the Arnold Viewer, after a short wait, you’ll notice that we will be getting our different passes on the dropdown menu on the left.
Each one of these texts is a new render pass, or AOV. This means you must divide the final image into all of these parts. Think of it as a painting; For a masterpiece, you need a canvas, a primer, base colour, and the different layers of oils that make the colours and shapes. It’s the same basic principle in the digital world.
As you can see, setting up most passes (and their derivatives) is quite easy. But what about other passes, such as Ambient Occlusion, or maybe Wireframe pass for our breakdowns? You can achieve this with a Material Override.
A material override means that, instead of creating more passes inside the same render, we create a setup that allows us to apply new materials on top of what we currently have.
That means it doesn’t matter what materials we previously used or the values we assigned (reflectivity, “metalness,” transmission, etc). The override will work OVER those original values, but can be turned on and off as needed.
RENDERING PART FOUR: AMBIENT OCCLUSION
We’ll set up a couple of very basic MAT Overrides, starting with the always relevant Ambient Occlusion pass.
Ambient Occlusion is one of the most important passes needed to create photoreal imagery. It creates a sense of global lighting which can also project contact shadows.
Think of how every object has a certain amount of shadows no matter the lighting, based on how close it is to other things. For example, look at the corner of your room. Notice how where the two walls meet, there seems to be this darker area that is not related to the lighting you have, it exists because of the proximity between the objects.
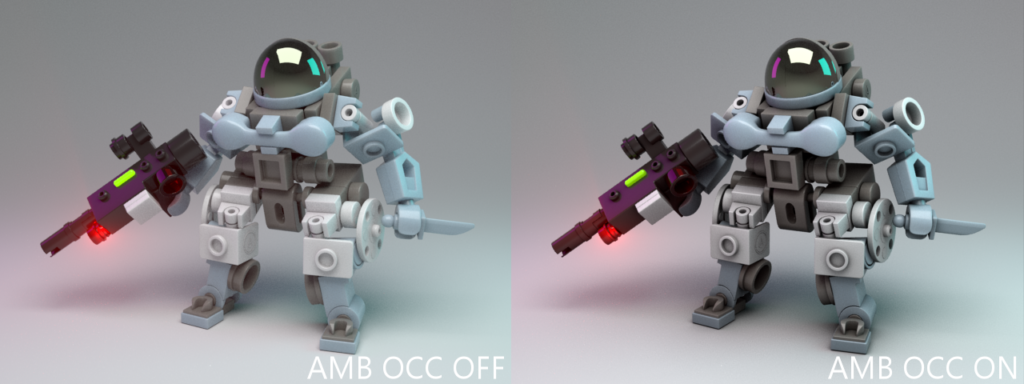
You can see how compositing Ambient Occlusion on top of the colours gives us a much more contrasty version of our image. The blacks in the image are darker and more noticeable, and the lighter areas in turn have a higher contrast that makes the image look a bit harsher (right) rather than the watered down tones we have on the left.

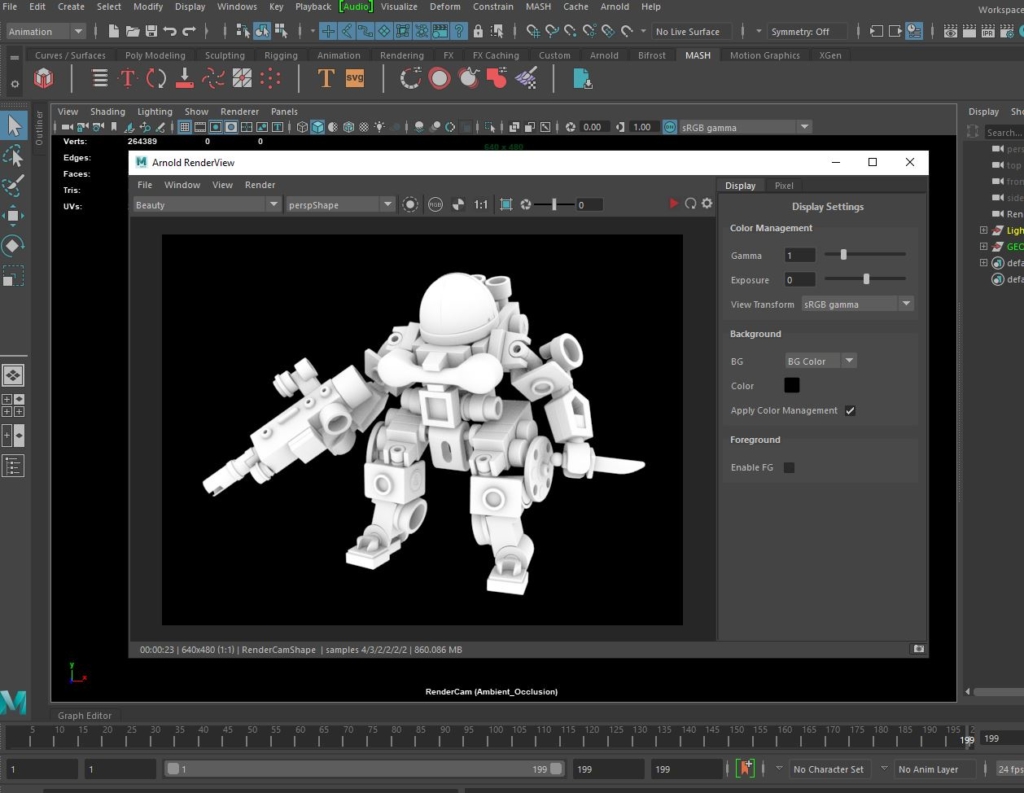
And this is the Ambient Occlusion pass by itself. It might look boring and weird, but that’s because it’s just there by itself. We will be talking about how to do the compositing of this on top of the RGB image later on.
For now, let’s concentrate on setting up our Ambient Occlusion override in Maya.
RENDERING PART FIVE: SETTING UP AMBIENT OCCLUSION
To start we will need to open the Render Layers settings on maya, which can be easily found on the main menus area

It’s important to point out that technically we can use this menu to set up and produce ALL of our AOVs or render passes, but it is still easier to do so from the AOVs menu under Arnold Render Settings, the setup time being considerably shorter.
Let’s have a look at the Render Layers:
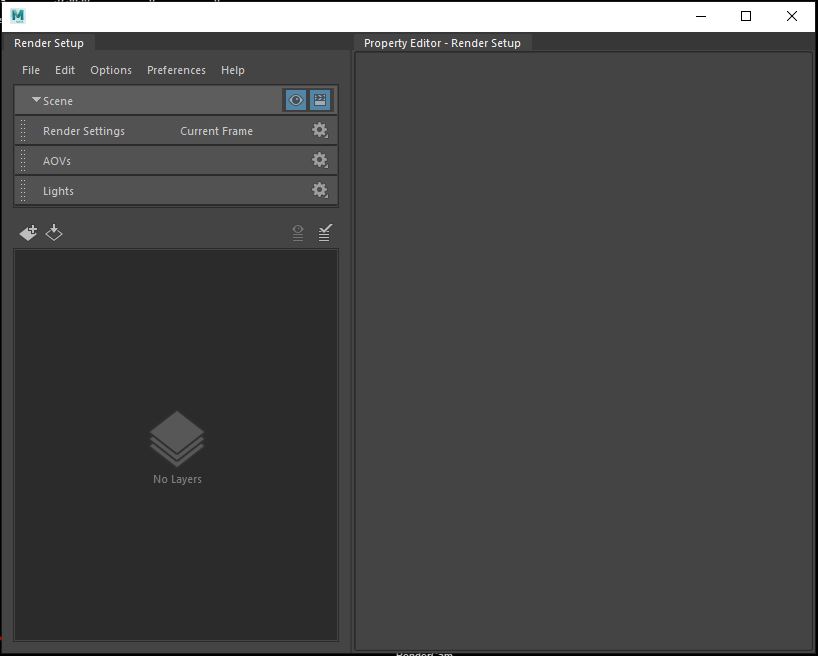
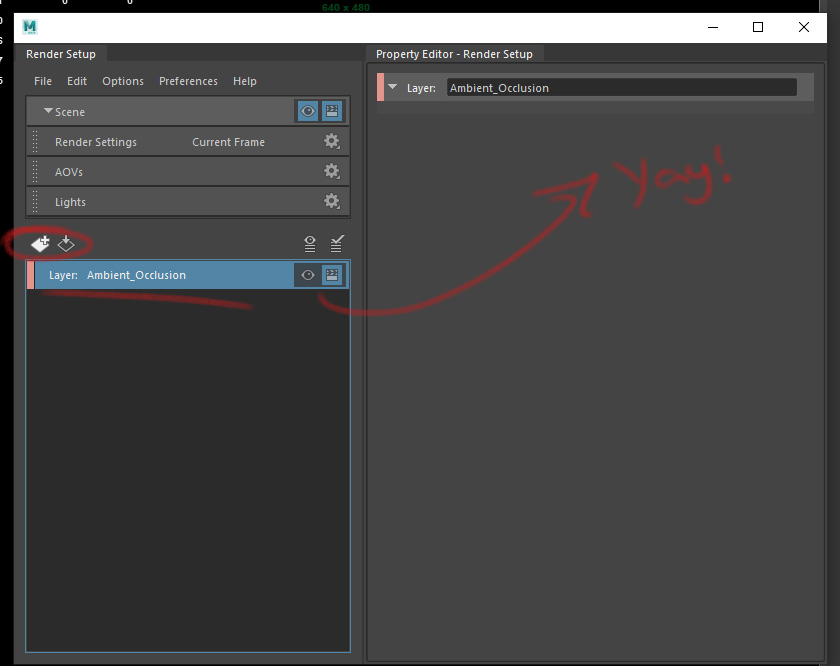
As you can see it’s pretty empty, but that’s because we haven’t set anything up. Let’s start by creating a Render Layer, which we will name Ambient Occlusion.
You set up a render layer by. Clicking on the button with the diamond shape and the plus sign.
The render Layers themselves start pretty empty, and this is because we have to fill them up ourselves. In order to do that, we need to first create a collection.
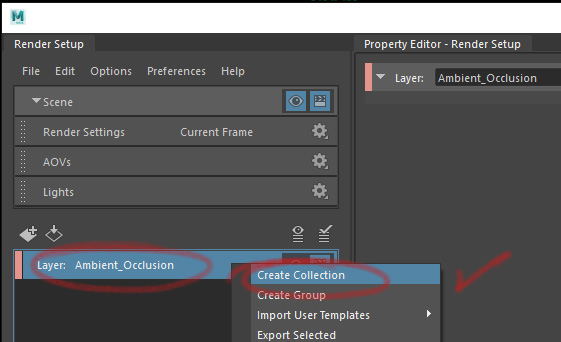
A collection is a list/group of the objects that are to be part of the render layer. In order to create one, we right click on the render layer where we want it to exist and select “Create Collection”. Let’s name it AMB_OCC_GEO, as in “Ambient Occlusion Geometry”.
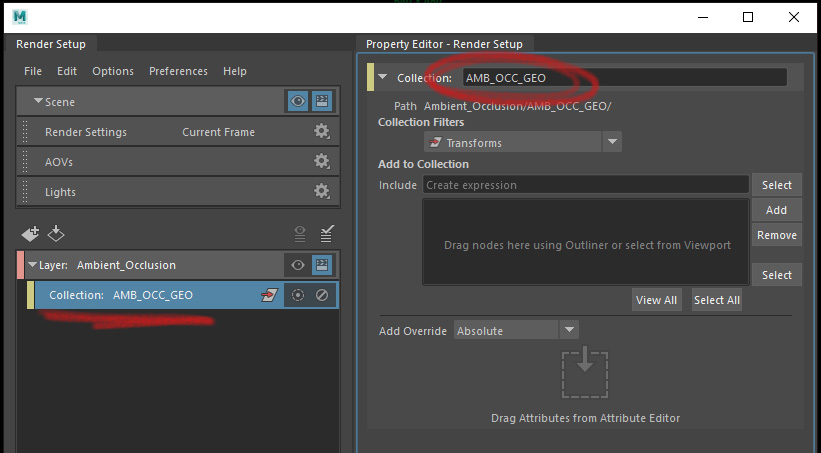
We must add anything we want to be part of the Ambient Occlusion into the property editor on the right hand side. Keep in mind that any lighting you previously set up will not have any impact on the Occlusion pass, so we just need to put out Geometry in here.
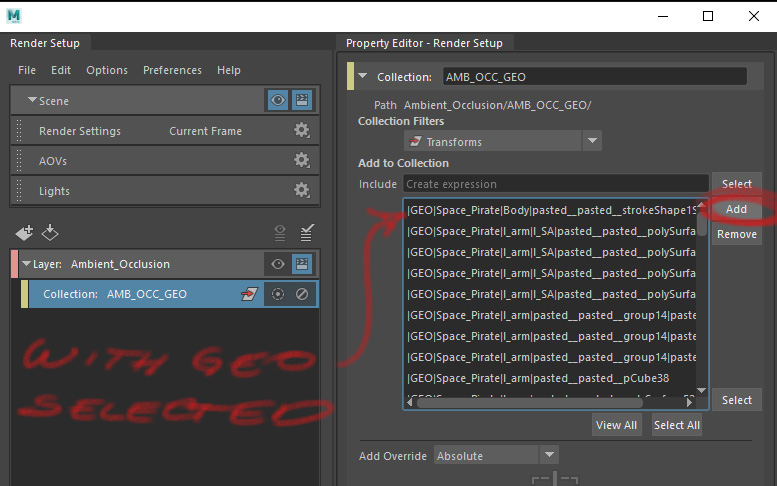
In order to Add elements into the collection, it’s as simple as:
- Selecting the Objects on the viewer or outliner
- Click on the ADD button right next to the “Add to Collection” menu.
- Done
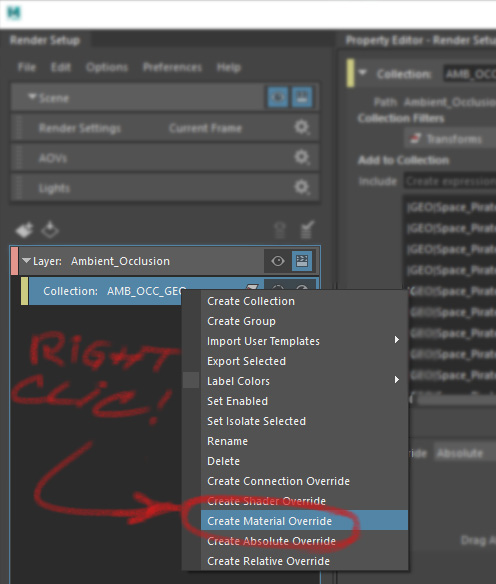
Hopefully you are starting to see how straightforward this actually is. With this done, we are 70% done setting up the Ambient Occlusion pass for our scene. All we need to add now is the actual Ambient Occlusion pass. For this, we are gonna right click on the Collection, and select “Create Material Override”. We will name this one ambOCC_MAT.
Inside this menu, we just need to Set up the Material we want to be overriding the entire layer.
Click on the Checker box icon next to the “Override Material” line, and then search and select the aiAmbientOcclusion material from the list.
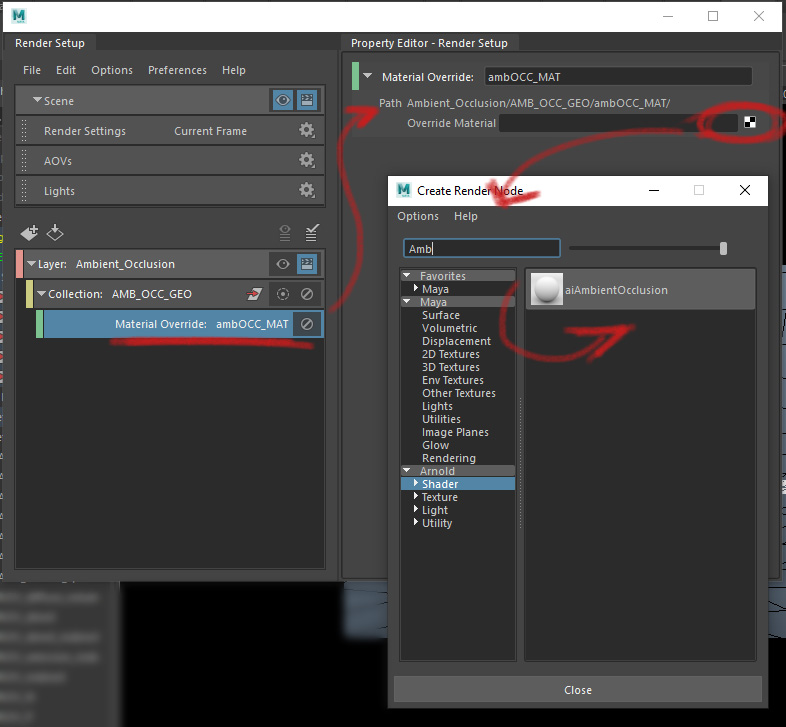
You can just search it in the “Create Render Node” menu to make your life that much easier.
We are almost ready to Test Render our Ambient Occlusion pass! But first, make sure it’s active. To do that, you simply have to click on the Eye on the layer we originally put everything.
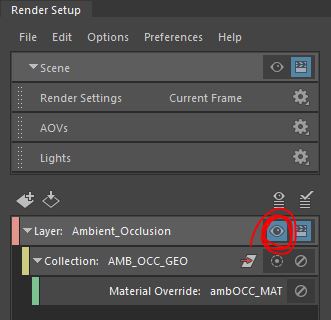
Once this is done, we will be using the Arnold render interface (Go to the menu line and search for Arnold > Render) and just click on it. Render should start automatically. If it doesn’t, just click on the Big Red Dorito on the upper right corner.
Excellent! You now know how to set up Layers, build collections, add elements and set Material Overrides where needed. We can start rendering out what we need in order to get our layers and passes to use in Nuke for the compositing of the image.
Related Links: